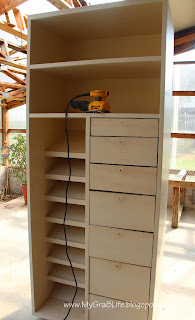
My grandma had this great storage unit in her walk-in closet. My mom could see great potential in it, so my grandma gave it to her to refinish. The pictures below will take you through the process of freshening up the tired piece of furniture! This technique can be used to refinish any piece of wood furniture.
Step 1: Prep the Piece of Furniture
Remove Knobs
Sand
Sand all parts of the piece of furniture. Sanding is very easy if you use an orbital sander as shown in the picture below. Some parts may need to be sanded by hand with sand paper. In the pictures below, you can see that the piece of furniture has angled shoe shelves. There is not enough space between the shelves to use the power sander, so those were sanded by hand.
Wipe Down
In order to remove all of the dust from sanding, wipe the piece of furniture clean using a damp cloth. After it dries, wipe again using a dry cloth to remove any leftover dust particles.
Step 2: Repair Damaged Areas
In the pictures below, you can see that there was some minor damage to the closet storage unit. The damage was not extensive, only a few minor holes. In order to repair the holes place a small amount of vinyl spackling in the hole. Wipe over the spackling with a damp cloth to make sure that it is smooth and level.
Before
After
Before After
Before
After
Step 3: Apply Primer & Paint Base Coat
Apply a coat of a good primer, like Kilz or Zinnser. This will cover any spackling used to repair damaged and any knots that might be in the wood. After the primer has completely dried, paint the storage unit with the base coat that you would like to use for the piece of furniture.
Step 4: Distress
Using an orbital sander distress the edges of the piece of furniture. You can distress to your desired liking. The more distressing you do, the more rustic the finished piece will look. The most important thing to remember about distressing is that the paint must cure (fully dry) before you can use a sander on it. If you try to distress the paint too soon, it will gum up.
Step 5: Apply Decorative Paint & Reattach Knobs
Using painter's tape, tape off a pattern that you would like to paint on the piece of furniture. This could be stripes, a chevron pattern, or other stylistic design. On the piece below plain masking tape was used. I would suggest using painter's tape, like FrogTape. If you are concerned about the paint bleeding under the tape (which it shouldn't if you use FrogTape) then you should paint the edge of the tape with a clear paint coat. This will seal the edge. Remove the tape immediately after painting the decorative coat.The decorative effects created on the closet storage unit shown below were done using two very similar green colors (one lighter than the other). Several widths of stripes were painted and several sizes of circles were painted using the two different colors.


No comments:
Post a Comment