I saw this really cool painted sign in a FrogTape advertisement in a "This Old House" magazine. I instantly wanted to try to recreate one for myself. Instead of making a sign, though, I decided to create silhouette art of my children and niece for my mom for Mother's Day. I think the artwork turned out really well and my mom loved the sentimental gift!
The Sign That Inspired My Silhouette Art!
 |
| FrogTape Ad from "This Old House" |
My Completed Silhouette Art
How to Make Wooden Silhouette Art
Step 1: Cut, Sand, and Stain Wood
Get a piece of wood at a hardware store or use an old piece that you might have lying around. I used a piece of pine that I purchased from Home Depot. I figured out how big I wanted each silhouette to be, then I cut the piece of wood to a size that would look good with my three silhouettes.
After cutting the wood, I sanded the surface of the board and the edges using an orbital sander with fine sand paper. Be careful not to use a sandpaper with a large grit because it will leave scratches on the wood that will show up after applying the stain.
Step 2: Create the Silhouettes
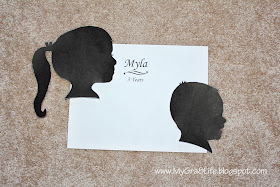
I took profile pictures of my children and my niece. As you can see, the quality of these pictures is not really important. If you can have the subject in front of a solid background that makes creating the silhouette easier. After taking the profile pictures, use Photoshop to create a silhouette. Once the silhouette is created and sized appropriately, print it out on card stock and cut it out. If you do not have Photoshop you could simply enlarge the picture so that each head (or whatever you are using for the silhouette) is the size that you would like it to be on the completed board. Have the picture printed and carefully cut the profile out.
Originally, I also created the names on Photoshop. But when I printed them on card stock and attempted to cut them they were really small, and I thought the letters might lose some of their smoothness as I attempted to cut them twice (you will be cutting vinyl in step 3). I then decided to create the names by cutting vinyl letters with my Cricut machine.
Pictures of the Silhouettes I Created
After the Silhouettes Were Printed on Card stock and Cut
Step 3: Trace the Silhouette on Vinyl and Cut
Place the card stock silhouettes on a piece of contact paper or vinyl and trace the outline carefully. Then cut the contact paper very precisely; the way that you cut it will be exactly how the final product will look. At this point you will also need to cut the names and ages out of the vinyl by hand or with a cutting machine, like the Cricut.
Step 4: Stick the Vinyl on the Board
In this step you will need to remove the backing from the contact paper and attach the vinyl to the board. Make sure that the stain is completely dry before completing this step. After attaching the silhouettes, names, and ages to the board, use the edge of a ruler to smooth any bubbles and to make sure that all of the edges are stuck tightly to the board. In the picture above the silhouettes are cut out of contact paper and the names and ages are cut out of red vinyl that I use for my Cricut machine (in case you were wondering why the colors are different!).
Step 5: Apply Clear Coat to Seal Vinyl
**THIS STEP IS VERY IMPORTANT!
Get a small can of a Clear Protector from a hardware store. Using a foam brush apply a coat of the Clear Protector over all of the edges of the vinyl. This will create a seal so that paint will not seep under the vinyl.
Step 6: Paint the Board
Using a foam roller and foam brush (these will not show brush strokes) paint the entire board. If you chose not to paint the back of the board you might want to use FrogTape so that you don't have to worry about paint from the edges running onto the back.
Allow the paint to dry completely before moving on top step 7.
Step 7: Tape the Chevron Pattern, Paint, and Remove Tape
After the paint has dried completely, apply FrogTape in a Chevron (zigzag) pattern. In order to tape my board I did a lot of measuring and marking with a pencil so that I made sure my tape was applied evenly. Immediately after taping, paint the board with a different color paint. After the paint has been applied, carefully remove the tape. You will then have something that looks similar to the picture below.
You will notice in this picture that when I removed the tape a little bit of my white paint pulled off as well. I had to lightly sand that area then reapply white paint. This happened because I did not allow the white paint to cure before applying the FrogTape.
Step 8: Remove the Vinyl
This step is very tedious because you must cut around the vinyl using a Xacto knife to break the seal that was created from the Clear Protector. Do this step very slowly and carefully so that you do not peel off any of the paint. After removing all of the vinyl your artwork should look similar to the picture above.
Step 9: Distress, if Desired
If you like a more rustic look, you have the option to distress the edges of the board. To distress the board, use a fine grit sandpaper and an orbital sander. If you attempt to sand the surface of the board, be very careful around the silhouette as the paint might pull away from the board. Good luck!


.JPG)
No comments:
Post a Comment