How to Create a Wooden Growth Chart
Step 1: Get Supplies
- Measuring Stick (Wooden Board) - 2 1/2" W x 1/4" D x 4' H (If you think your child will be a lot taller than 6' you might want to get a longer board.)
- Wooden (Name) Letters - 5" H
- Wooden Numbers - 1" H (Purchase numbers for as many years as you plan to chart your child's growth so that you have them on hand year after year.)
- Craft Board (1/4" D or thinner) (this is only needed if you plan to make the flower shape)
- Yard Stick
- Paints
- Thin Sharpie
- Command Hanging Strips or Wood Glue
- Box cutter or Jigsaw (depending on thickness of craft board) (this is only needed if you plan to make the flower shape)
- Sand Paper
The measuring stick can be purchased at Lowe's for about $3.00. The wooden letters and wooden numbers can be purchased at A.C. Moore for about $1.50 and $.50, respectively. You can use Command Strips or wood glue to hang the growth chart and child's name. I would recommend using the Command Strips so that the growth chart is easy to take off of the wall, should you move or want to redecorate.
Step 2: Paint the Letters, Numbers, and Boards
Name Letters
I decided to create one growth chart for my son and one for my daughter. You will see both displayed below. I coordinated the colors used on the measuring board with the colors used on the letters. For example, I painted my son's name letters light green with a taupe stripe. I painted my son's measuring board the same taupe color used for the stripe on his name letters.
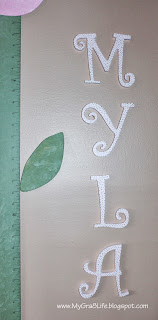
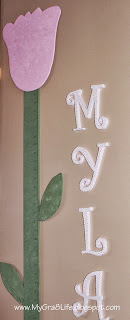
I painted my daughter's letters and numbers light pink with green dots.
Numbers
I painted the numbers the same color/stripe pattern as the letters for both my son and daughter's names. As you can see below, I painted enough numbers so that I can chart their height up to age 16.
Measuring Stick
I painted my son's measuring stick taupe, which matches the stripes on his name letters. I painted my daughter's measuring stick dark green then sponged light green on top of it to make it look more like the stem of a flower.
After painting your measuring stick, mark the lines on the measuring stick using a yard stick. I started my measuring stick at 24" (2 feet) and it goes up to 72" (6 feet). Use a thin Sharpie to complete the measuring stick.
Flower
In order to create the flower, trace a tulip (or other desired flower) design and leaf designs on the craft board. Depending on the thickness of the board you might be able to cut it with a box cutter or you will need to use a jigsaw. After cutting the board, sand the edges until they are smooth.
Paint the flower a desired color. I painted the flower pink and then sponged it with light pink. I painted the leaves dark green and then sponged them with light green (the same as the measuring stick).
Step 3: Hang It!
Attach Command Strips to the back of the measuring stick or prepare it with wood glue. Place the measuring stick on the wall at the appropriate height. (If you are using wood glue, place tape over the measuring stick to hold it in place on the wall.) For example, if your stick starts at 24", make sure that the bottom edge is at exactly 24" on the wall. If you are creating a flower, attach the head of the flower and leaves using Command Strips or wood glue.
Hang the name letters somewhere near the measuring stick using Command Strips or wood glue. Each year on your child's birthday, attach one of the prepared wooden numbers to the measuring stick using wood glue. Place a piece of tape over the number to hold it in place while the wood glue dries.
Check out my final product below...


No comments:
Post a Comment