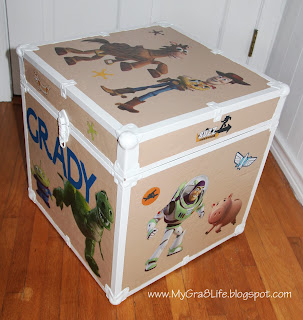
Do you have an old toy chest sitting around or perhaps tucked away in your attic? That's where these toy boxes were before being refinished. They belonged to my brother and I as children and were originally covered with clown wallpaper. We updated them for my niece and my son to use. Read below to learn how we did it.
The Completed Look
Step 1: Prep the Toy Box
In order to prepare the toy box you must first remove as much of the old wallpaper/covering as possible. Then sand any remaining paper to leave the surface as smooth as possible.
Step 2: Paint the Toy Box
We painted the metal edges of both toy boxes white. We painted the toy box for my niece a lime green color that I happened to have. We painted the toy box for my son the same taupe color that is on his bedroom walls. The toy box might require two or three coats of paint. Don't be alarmed if the surface is not completely smooth, the decals will hide a lot of the remaining roughness.
Note - it is best if your paint has some type of sheen to it. We originally used a flat paint, which looked very dull and enhanced some of the imperfections on the surface of the toy box.
Step 3: Add Decals
We found Minnie Mouse decals at Toys"R"Us and Toy Story decals at A.C. Moore. They were about $12.00 and contained more than enough decals for our project. The first thing that we did was quickly cut the decals out so that we could decide how we wanted to layout our project. We started with the big decals and applied them on to each side of the box. Applying the decals is very easy. Start at the top as shown in the picture above. Carefully peel away the backing paper and stick the decal on the toy box. As you continue to peel away the backing paper, rub over the decal with a credit card or your hand to smooth it down and avoid bubbles. If you do not like the positioning of your decal you should be able to move it without a problem. Carefully peel it off and reposition.
After applying the larger decals, you can add the smaller decals to enhance the look of the box. Below are the pictures of our completed toy boxes! I hope yours look great too!


No comments:
Post a Comment