Tuesday, July 30, 2013

Creative Baby Bump Photos

 
When you're in those nine months of pregnancy, it can seem like time is at a standstill.  Believe me, I know!  But, after the baby arrives and you look back on it, the pregnancy really did go pretty quickly.  You also quickly forget how you felt and looked while toting around that baby bump.  Try taking some maternity photos to remember all of those backaches and sleepless nights.  Oops, I meant those precious kicks and the beautiful heartbeat of the sweet baby growing inside of you! 

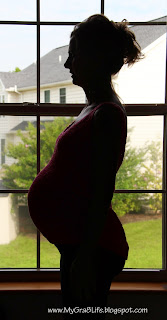
Silhouette


In order to create a silhouette photo like the one above, you need the perfect room.  You need a room that has only one source of light, be it an open door or window.  The rest of the room needs to be dark.  Do not turn on any lights.  Stand in front of the lighted area.  Be sure to stand with your profile showing so that your baby bump is evident.

Heart Shadow

 
If you have a trip to the beach planned during the later stages of your pregnancy, be sure to use that opportunity to get some great photos.  One that I love is the heart shadow on the baby bump.  Have your husband or anyone you choose kneel down in the sand and make a heart with his hands.  You will have to experiment a little bit to determine where to stand to place the heart perfectly.  Then have the photographer stand behind the person making the heart shadow to capture the picture.
 
A variation to this picture would be to show the person who is making the shadow in the photo as well.  For example, you could incorporate your husband, boyfriend, etc. into the picture, too, by taking the photo from a little farther away. 


Pregnant Mom with Sibling


"My belly doesn't look like that Mommy?"

 
What's cuter than getting your daughter excited about her new little brother or sister?  Maybe a picture of her analyzing her belly as you check out yours! 


Old Fashioned Telephone

 
In order to take the "Old Fashioned Telephone" picture, you will need to get two metal cans and a piece of thick string or yarn.  Remove the labels from the cans and wash thoroughly.  Using an ice pick or drill bit, make a small hole in the bottom of each can.  Place the string through the hole and tie a large knot that will not slip through.  You now have the two telephones.  Have your child, husband, boyfriend, etc. hold one end of the phone to his or her ear, and you hold the other end on your belly.  This makes a cute picture, and your child will get a huge kick out of chatting with the baby!  Don't forget to stand with the profile of your baby bump showing.


Child Kissing Baby Bump

This picture works well on the beach because you have your belly out and the background is pretty.  You could take it anywhere though.  Kneel down, then have your child kiss your baby bump.  Make sure that you are sitting with you profile to the camera.  You could also include your husband, boyfriend, etc. in the picture.


Baby Before and After


In order to take this picture, pick an outfit that will show your belly while you are pregnant but that will also look okay after the baby is born.  The first photo should be taken close to your due date, but while you are still pregnant.  Stand in front of a plain wall and have your profile picture taken.  Hold your hand that is closest to the camera under your bump, just like you will when holding the newborn baby.  Shortly after the baby is born, put that same outfit on and stand in front of the same wall.  Hold the baby with your arms the way they were when the picture was taken of you holding your baby bump.  Curl the baby's legs under and hold him low on your stomach.  It is amazing to think that little guy fit in your belly just a few short days before!

I then took the two pictures and compiled them into one using Photoshop.  You can see the final picture below.

Tuesday, July 16, 2013

DIY Growth Charts - Super Cute & Timeless

 
Have you been thinking about buying a growth chart to mark your child's height each year on his birthday?  If the answer is "yes," then you should consider creating a homemade growth chart.  It is really easy to make and looks great in your home!

How to Create a Wooden Growth Chart


Step 1:  Get Supplies


  • Measuring Stick (Wooden Board) - 2 1/2" W x 1/4" D x 4' H  (If you think your child will be a lot taller than 6' you might want to get a longer board.)
  • Wooden (Name) Letters - 5" H
  • Wooden Numbers - 1" H (Purchase numbers for as many years as you plan to chart your child's growth so that you have them on hand year after year.)
  • Craft Board (1/4" D or thinner) (this is only needed if  you plan to make the flower shape)
  • Yard Stick
  • Paints
  • Thin Sharpie
  • Command Hanging Strips or Wood Glue
  • Box cutter or Jigsaw (depending on thickness of craft board) (this is only needed if you plan to make the flower shape)
  • Sand Paper

The measuring stick can be purchased at Lowe's for about $3.00.  The wooden letters and wooden  numbers can be purchased at A.C. Moore for about $1.50 and $.50, respectively.  You can use Command Strips or wood glue to hang the growth chart and child's name.  I would recommend using the Command Strips so that the growth chart is easy to take off of the wall, should you move or want to redecorate.

Step 2: Paint the Letters, Numbers, and Boards


Name Letters

 
I decided to create one growth chart for my son and one for my daughter.  You will see both displayed below.  I coordinated the colors used on the measuring board with the colors used on the letters.  For example,  I painted my son's name letters light green with a taupe stripe.  I painted my son's measuring board the same taupe color used for the stripe on his name letters.
 
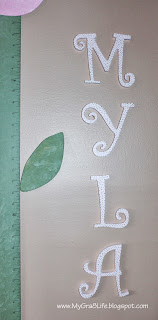
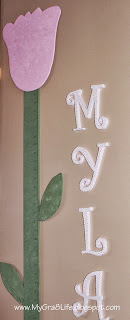
I painted my daughter's letters and numbers light pink with green dots.
 

Numbers


I painted the numbers the same color/stripe pattern as the letters for both my son and daughter's names.  As you can see below, I painted enough numbers so that I can chart their height up to age 16. 


Measuring Stick


I painted my son's measuring stick taupe, which matches the stripes on his name letters.  I painted my daughter's measuring stick dark green then sponged light green on top of it to make it look more like the stem of a flower.

After painting your measuring stick, mark the lines on the measuring stick using a yard stick.  I started my measuring stick at 24" (2 feet) and it goes up to 72" (6 feet).  Use a thin Sharpie to complete the measuring stick.


Flower


In order to create the flower, trace a tulip (or other desired flower) design and leaf designs on the craft board.  Depending on the thickness of the board you might be able to cut it with a box cutter or you will need to use a jigsaw.  After cutting the board, sand the edges until they are smooth. 

Paint the flower a desired color.  I painted the flower pink and then sponged it with light pink.  I painted the leaves dark green and then sponged them with light green (the same as the measuring stick). 
 

Step 3: Hang It!

 
Attach Command Strips to the back of the measuring stick or prepare it with wood glue.  Place the measuring stick on the wall at the appropriate height.  (If you are using wood glue, place tape over the measuring stick to hold it in place on the wall.)  For example, if your stick starts at 24", make sure that the bottom edge is at exactly 24" on the wall.  If you are creating a flower, attach the head of the flower and leaves using Command Strips or wood glue.
 
Hang the name letters somewhere near the measuring stick using Command Strips or wood glue.  Each year on your child's birthday, attach one of the prepared wooden numbers to the measuring stick using wood glue.  Place a piece of tape over the number to hold it in place while the wood glue dries. 
 
Check out my final product below... 


Friday, July 12, 2013

Refinished Toy Boxes with Minnie Mouse and Toy Story Vinyl Decals

Do you have an old toy chest sitting around or perhaps tucked away in your attic?  That's where these toy boxes were before being refinished.  They belonged to my brother and I as children and were originally covered with clown wallpaper.  We updated them for my niece and my son to use.  Read below to learn how we did it.


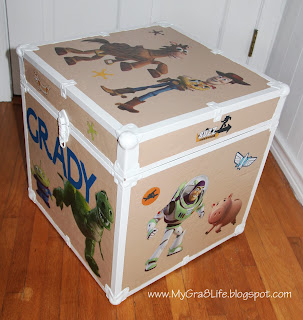
The Completed Look


Step 1: Prep the Toy Box


In order to prepare the toy box you must first remove as much of the old wallpaper/covering as possible.  Then sand any remaining paper to leave the surface as smooth as possible. 

Step 2: Paint the Toy Box


We painted the metal edges of both toy boxes white.  We painted the toy box for my niece a lime green color that I happened to have.  We painted the toy box for my son the same taupe color that is on his bedroom walls.  The toy box might require two or three coats of paint.  Don't be alarmed if the surface is not completely smooth, the decals will hide a lot of the remaining roughness.

Note - it is best if your paint has some type of sheen to it.  We originally used a flat paint, which looked very dull and enhanced some of the imperfections on the surface of the toy box.

Step 3: Add Decals


We found Minnie Mouse decals at Toys"R"Us and Toy Story decals at A.C. Moore.  They were about $12.00 and contained more than enough decals for our project.  The first thing that we did was quickly cut the decals out so that we could decide how we wanted to layout our project.  We started with the big decals and applied them on to each side of the box.  Applying the decals is very easy.  Start at the top as shown in the picture above.  Carefully peel away the backing paper and stick the decal on the toy box.  As you continue to peel away the backing paper, rub over the decal with a credit card or your hand to smooth it down and avoid bubbles.  If you do not like the positioning of your decal you should be able to move it without a problem.  Carefully peel it off and reposition.

After applying the larger decals, you can add the smaller decals to enhance the look of the box.  Below are the pictures of our completed toy boxes!  I hope yours look great too!